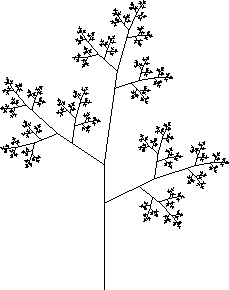
We now try to get our turtle to trace out a tree. In our tree, we start with a trunk, and then add two branches at the top. Then, at the end of each branch, we will add more branches.
First, we prefer our trees to grow up, so we change the turtle's initial heading. We also set our angle to be 45.
>
  read(`turtle.txt`);
  SetInitialTurtleHeading(90);
  SetTurtleAngle(45);
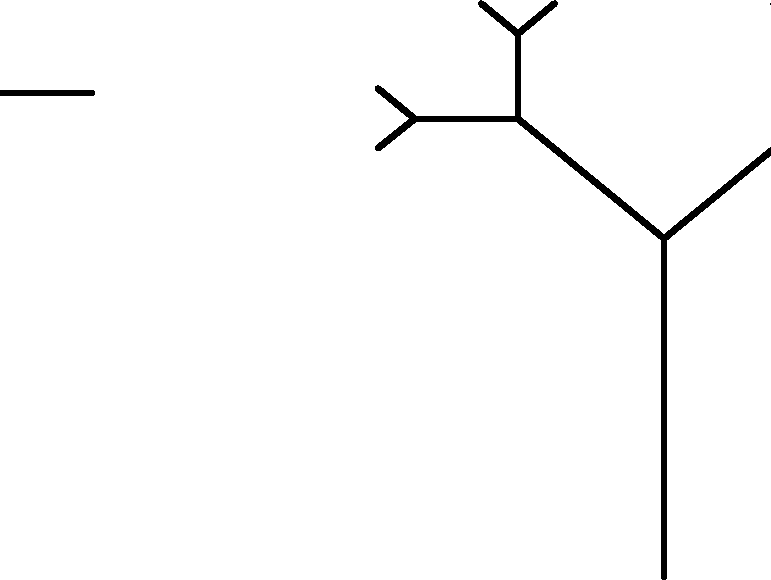
The trunk of our tree will have no branching, and will just be the single
command F. We will call this ![]() . For
. For ![]() , we add a pair
of branches to the top, to make a Y shape.5.8
At each subsequent stage, we add another level of branches, as below:
, we add a pair
of branches to the top, to make a Y shape.5.8
At each subsequent stage, we add another level of branches, as below:
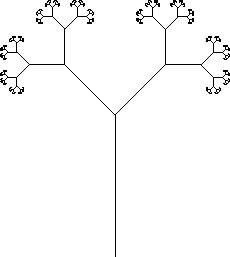
How do we go about implementing this? As in the case of the Koch curve, we
can use recursion, by noticing that ![]() contains two small copies
of
contains two small copies
of
![]() forming the left and right limbs of the tree. Thus, we
can define Tn recursively. Before proceeding, you might want to take a
minute to think about how to do this on your own.
forming the left and right limbs of the tree. Thus, we
can define Tn recursively. Before proceeding, you might want to take a
minute to think about how to do this on your own.
Notice that the letter Y cannot be drawn without either
retracing part of the curve or lifting your pen. Rather than using a
PenUp and PenDown command to tell the turtle to stop
drawing,5.9we will have our turtle back up over a branch after we draw it. We
also have to make sure our turtle is pointing in the proper direction
when we finish the branch, or things won't work out at all.
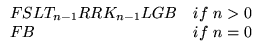
Thus, T0 = FB, and we can take T1 as ``F S LFBR RFBL G B''. The ``LFBR'' part goes out the left branch and returns, and ``RFBL'' goes out the right branch and returns. To get T2, we replace each copy of ``FB'' in T1 with a scaled version of all of T1, after turning a bit to the left or right. In general, we have
 .
.
Using this, it is now easy to write the generating procedure.
>
  Tree:= proc(n::nonneg)
    options remember;
    if (n=0) then
       `FB`;
    else
       cat(`FSL`, Tree(n-1), `RR`, Tree(n-1), `LGB`);
    fi;
  end:
>
  TurtleCmd(Tree(10));
You might want to experiment with varying the angle and the scale factor,
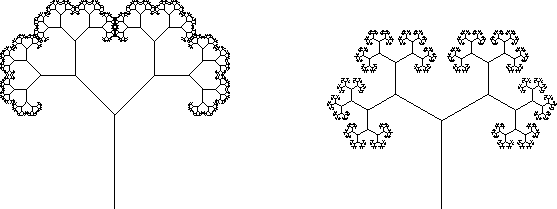
and see how the tree changes. For example, if we use
SetTurtleScale(.6), the branches of ![]() just touch, and they
overlap in
just touch, and they
overlap in ![]() if n > 8. However, if we change the angle to
60, the branches stay away from each other.
if n > 8. However, if we change the angle to
60, the branches stay away from each other.
>
  ResetTurtle(); SetInitialTurtleHeading(90);
  SetTurtleAngle(45); SetTurtleScale(.6);
  t10a:=TurtleCmd(Tree(10)):
>
  SetTurtleAngle(60);
  t10b:=TurtleCmd(Tree(10)):
>
  plots[display](array([t10a, t10b]));
As an extra challenge, try your hand at producing a fern like the one below.